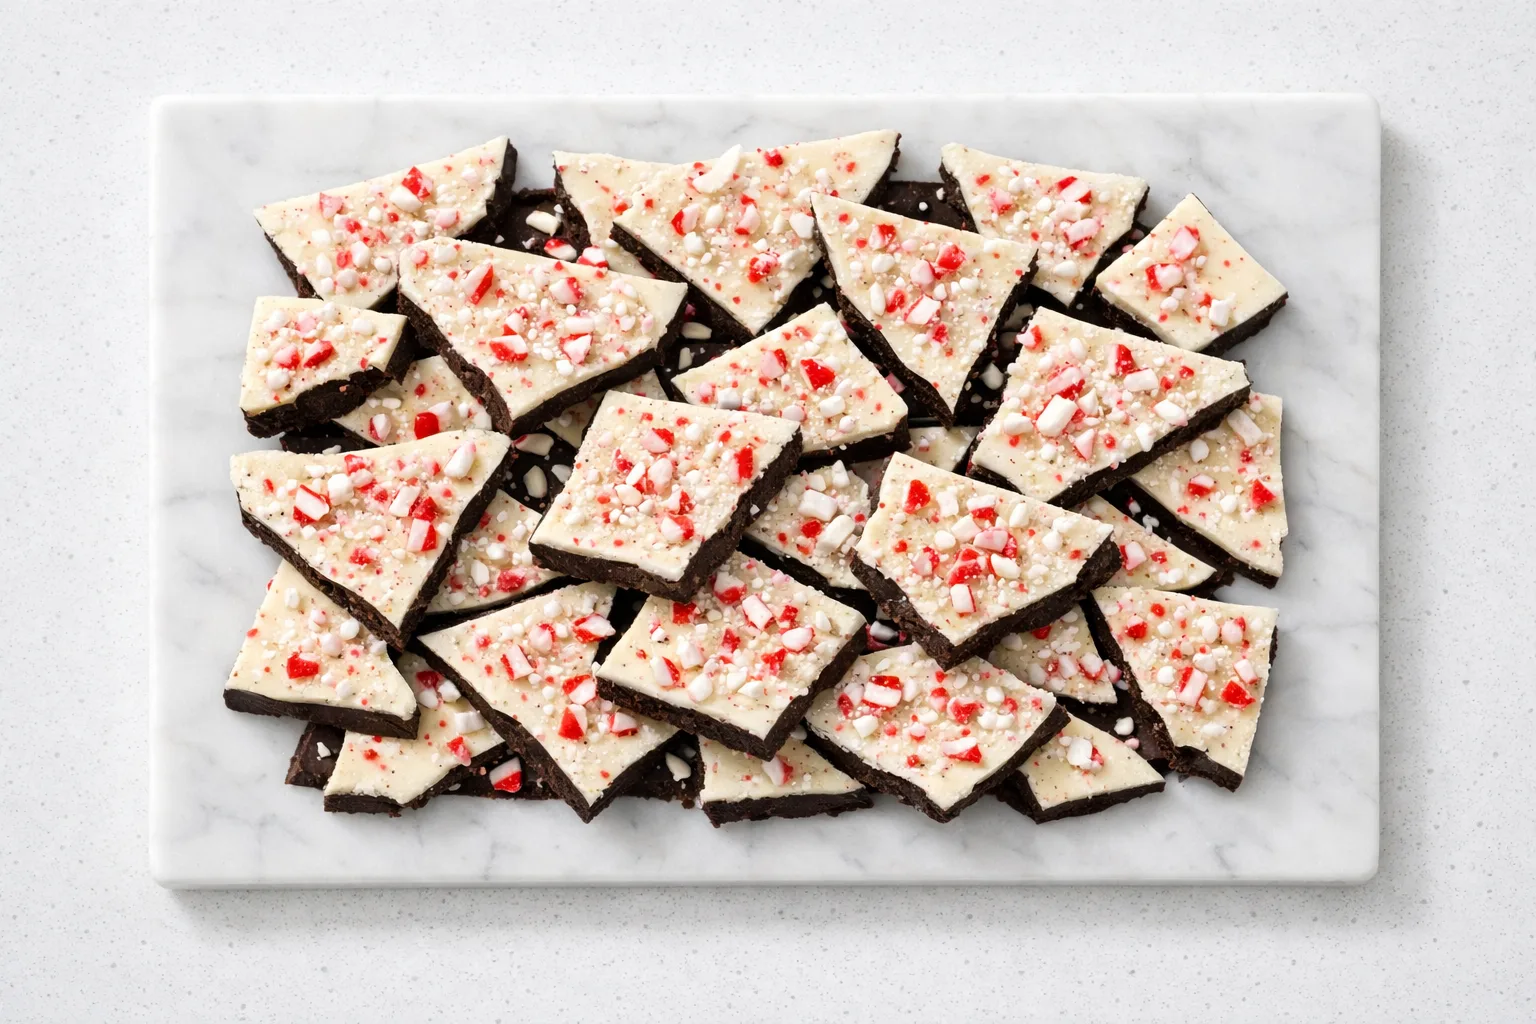
Peppermint bark became an American Christmas staple in the 1990s, popularized by Williams-Sonoma, but the combination of chocolate and mint goes back much further. The concept is simple: a slab of dark chocolate layered with white chocolate and studded with crushed candy canes. What separates good peppermint bark from the waxy, too-sweet versions is using real chocolate (not candy melts) and getting the layers thin enough to snap cleanly.
This recipe builds the bark in two layers on a single sheet pan. The dark chocolate base sets up firm while the white chocolate layer on top stays just slightly softer, giving you that satisfying snap followed by a slow melt. Crushed candy canes pressed into the surface add crunch and a sharp peppermint hit that cuts through the richness.
Equipment
Instructions
Tap each step to track your progress
- 1
Line a large rimmed baking sheet (18x13 inch half sheet) with parchment paper, letting the paper overhang the long sides by about 2 inches for easy removal later.
- 2
Place the candy canes in a zip-top bag and crush them with a rolling pin into a mix of fine dust and small chunks, no larger than a pea. Set aside. Avoid pulverizing them into pure powder; you want textural contrast.
- 3
Melt the dark chocolate in a heatproof bowl set over a pot of barely simmering water (the bowl should not touch the water). Stir frequently with a silicone spatula until completely smooth and the chocolate reaches about 115F / 46C. Remove from heat, stir in the peppermint extract and salt.
- 4
Pour the melted dark chocolate onto the prepared baking sheet. Using an offset spatula, spread it into an even layer about 1/8 inch thick. It does not need to cover the entire pan; aim for a roughly 12x16 inch rectangle with straight-ish edges. Transfer the sheet to the refrigerator for 10 minutes, until the chocolate is set but not rock-hard.
- 5
While the dark chocolate sets, melt the white chocolate using the same double-boiler method. White chocolate burns easily, so keep the heat low and stir constantly. Remove from heat as soon as smooth (around 105F / 40C) and stir in the peppermint extract.
- 6
Remove the baking sheet from the refrigerator. Pour the white chocolate over the dark chocolate layer and spread evenly with a clean offset spatula, covering the dark layer completely.
- 7
Immediately scatter the crushed candy canes over the white chocolate while it is still wet. Press them gently into the surface with your fingertips so they adhere.
- 8
Refrigerate the bark for at least 30 minutes until fully set and firm to the touch. The white chocolate layer should feel hard, not tacky.
- 9
Lift the bark out of the pan using the parchment overhang. Place on a cutting board and break or cut into irregular pieces, roughly 2 inches across. A sharp chef's knife run under hot water and wiped dry gives the cleanest cuts.
Tips & Tricks
Use real chocolate, not candy melts
Baking chips and candy melts contain palm oil and stabilizers instead of cocoa butter, which gives them a waxy mouthfeel. Real chocolate (check the ingredients for cocoa butter) melts smoothly and snaps cleanly. Look for couverture chocolate or brands like Ghirardelli, Callebaut, or Valrhona.
Chop the chocolate finely and evenly
Smaller, uniform pieces melt faster and more evenly, reducing the risk of overheating. A serrated bread knife works well for chopping chocolate bars. Aim for pieces no larger than a nickel.
Control the candy cane texture
Crush the candy canes to a mix of sizes: some fine dust for peppermint flavor in every bite, some pea-sized chunks for crunch. If you crush them too fine, you lose the texture; too coarse, and they do not stick to the chocolate.
Make it ahead for gifting
Peppermint bark is one of the best make-ahead Christmas treats. It holds well for weeks and ships without fuss. Stack pieces between layers of parchment or wax paper in tins, cellophane bags, or mason jars. Tie with ribbon for an effortless, impressive holiday gift.
Work quickly with the white chocolate
White chocolate sets faster than dark, especially when it hits the cold dark chocolate base. Have your crushed candy canes measured and ready before you start spreading the white layer. Once it is poured, you have about 90 seconds before it starts firming up.
Troubleshooting
The chocolate layer looks dull and streaky
The chocolate seized or was exposed to moisture. Even a single drop of water or steam can cause chocolate to seize into a grainy mass. Make sure your bowl, spatula, and work surface are completely dry. If using a double boiler, keep the water at a bare simmer and do not let it splash.
The white chocolate layer is separating or looks oily
White chocolate overheated. It is far more temperature-sensitive than dark chocolate and will break above 110F / 43C. Melt it slowly over barely simmering water, stirring constantly, and pull it off the heat as soon as the last lumps dissolve. If it does break, try stirring in a teaspoon of warm cream to bring it back together.
The candy canes fell off after the bark set
They were added too late, after the white chocolate had already started to firm up. Scatter the candy cane pieces immediately after spreading the white chocolate layer, within 60 seconds, and press them gently into the surface. They need wet chocolate to bond.
The bark bends instead of snapping
The layers are too thick, or the bark is not cold enough. Aim for a combined thickness of about 1/4 inch. Let the finished bark chill for a full 30 minutes in the refrigerator before breaking. Bark snaps best when cold.
The two layers separate when I break the bark
The dark chocolate layer was too hard when the white chocolate went on top. The base layer needs to be set but not ice-cold. If you left it in the fridge too long, let it sit at room temperature for 2-3 minutes before adding the white layer. A slightly tacky surface helps the layers bond.
Variations
Triple Chocolate Bark
Add a middle layer of milk chocolate between the dark and white layers. Use 8 oz of each chocolate type. The milk chocolate rounds out the flavor and gives you a striking three-stripe cross section when broken.
Dairy-Free Peppermint Bark
Use a high-quality dairy-free dark chocolate (most 70%+ dark chocolates are naturally dairy-free) and substitute the white chocolate with a cocoa butter-based dairy-free white chocolate alternative. The texture is slightly different but the mint-chocolate contrast still works well.
Matcha Peppermint Bark
Replace the white chocolate topping approach: melt the white chocolate as directed, then whisk in 1 tablespoon of culinary-grade matcha powder before spreading. The earthy bitterness of matcha plays surprisingly well against peppermint and dark chocolate, and the green color looks striking.
Spiced Mexican Chocolate Bark
Add 1/2 tsp ground cinnamon and a pinch of cayenne pepper to the dark chocolate layer. Skip the peppermint extract in the dark layer and keep it only in the white. The gentle heat from the cayenne builds slowly and pairs well with the cooling mint on top.
Serving & Gifting
Break the bark into rustic, irregular pieces and pile them on a platter or cake stand for a holiday dessert table. Peppermint bark pairs well with coffee, hot chocolate, or a glass of port. For a cookie swap or party, stand the pieces upright in a shallow bowl so the two-tone layers are visible.
Storage & Freezing
Store peppermint bark in a single layer (or separated by parchment paper) in an airtight container at room temperature for up to 2 weeks, or in the refrigerator for up to 3 weeks. It freezes well for up to 2 months; thaw in the refrigerator overnight before serving. Keep it away from heat and strong odors, as chocolate absorbs nearby smells.
Common Questions
How do I make peppermint bark without a double boiler?
Use the microwave in 20-second intervals at 50% power, stirring between each burst. This works well for both dark and white chocolate. Stop microwaving when a few small lumps remain and stir until they melt from residual heat. The double boiler method gives more control, but the microwave is faster.
Can I use milk chocolate instead of dark chocolate?
Yes. Milk chocolate makes a sweeter, milder bark. Reduce or skip the peppermint extract in the milk chocolate layer since the mint from the candy canes and white layer will be enough. The overall flavor profile will be less complex but still good.
How long does homemade peppermint bark last?
Stored in an airtight container at room temperature, peppermint bark keeps for 2 weeks. Refrigerated, it lasts up to 3 weeks. Frozen in a sealed container with parchment between layers, it keeps for 2 months. Let refrigerated or frozen bark come to cool room temperature before serving for the best snap.
Why does my white chocolate taste burnt or bitter?
White chocolate scorches at lower temperatures than dark chocolate, around 110F / 43C. Once burnt, the flavor cannot be saved and you will need to start over with fresh white chocolate. Melt it slowly, stir constantly, and remove it from heat the moment it looks smooth.
Can I add other toppings besides candy canes?
Absolutely. Chopped toasted almonds, crushed Oreos, dried cranberries, sprinkles, or flaky sea salt all work well. Press toppings into the wet white chocolate just like the candy canes. For the most festive look, stick with the classic red and white candy cane pieces and add a light sprinkle of flaky salt.
Is peppermint bark gluten-free?
Pure chocolate and candy canes are naturally gluten-free, so this recipe is gluten-free as written. Check your specific chocolate brand's label for any cross-contamination warnings if you are cooking for someone with celiac disease. Most major chocolate brands process on shared equipment.